By: ReinMan
 |
There
is one funky feature of Photoshop that
many people seem either terrified of,
indifferent to, or possibly in ignorance
of. I speak, of course, about the Dreaded
Clipping Mask feature of Photoshop.
This
tutorial will be a basic introduction
to this great feature; a feature that
will (as your therapist suggested many
times) allow you to deal with your "Boundary
Issues". At least as far as Photoshop
goes! |
| So,
to start with: A clipping mask is a great
way (one example) to keep shadows where
they belong. |
There
are a few ways to create a clipping
mask layer, but the way I like
doing it is to add a layer ABOVE where
you want the new layer to fall on.
So click on the layer you want your shadow stuff to appear on and then click
the NEW LAYER icon at the bottom of the layers pallette. NOTE: the
lower layer should be a cut out layer - not an image that covers the whole image
frame. |
 |
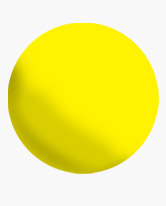
That
Italian table cloth behind the image
is the way I've set up my transparency
settings - never liked GRAY too much.
To make this TUT easier to view I'll
add a blank white backgroud behind (on
a lower layer) my circle object.
|
 |
There
are a few ways to create a clipping
mask layer, but the way I like
doing it is to add a layer ABOVE where
you want the new layer to fall on.
So click on the layer you want your shadow stuff to appear on and then
click the NEW LAYER icon at the bottom of the layers pallette.
NOTE: the
lower layer should be a cut out layer - not an image that covers
the whole image frame. The edges of this
object will become the BOUNDARIES for
the clipping mask.
|
 |
So you've got an cut
out image and now you have a new blank
layer above it.
On the New Layer Above take
a brush and paint fuzzy gray fill over
part
of
the image. You'll
notice
that it covers OUTSIDE the boundary
of the lower layer shape.
Unless you are going
for a "Sun Peeking From Behind Clouds"
kinda thing, this just won't do. Here
is where the Amazing Clipping Mask
comes into play.
|
 |
Put
your mouse cursor on the line dividing
the two layers you just made (the lower
layer with your main image and the upper
layer with the "gray fuzzy stuff" on
it.) Your cursor turns into a Pointing
Finger Hand thang (A). Now
hold down your ALT key (or MAC equivalent)
and
you'll see
the
cursor turn into a funky overlapping circle
thing with an arrow pointing out the side
(B).
|
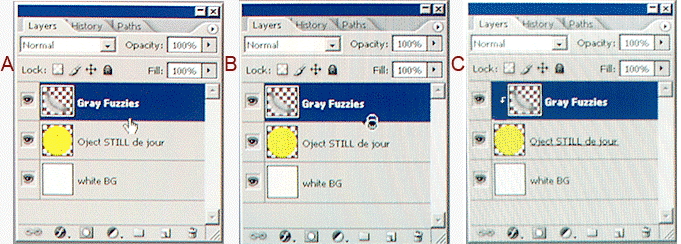 |
Right
CLICK! (C) The
upper layer jumps to the right with a
nifty angled arrow pointing
to the
Object layer below.
Note: to CANCEL a Clipping Mask layer just
re-click on the dividing line again and it
will toggle back and forth. |
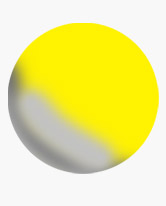
In the our example image
the gray fuzzy should ONLY be over
the
shape
below now.
Where the
lower layer image ISN'T the Gray Fuzzy
ISN'T.
This keeps the upper
layer ONLY in the place where the lower
layer
is.
Effectively, the gray
fuzzy must stay within the boundary
set by the shape of the oject below!
|
 |
|
|
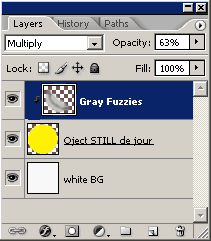
To
make this particular shadow more realistic
I've set the OPACITY of the Clipping
Layer (the upper layer) to 63%, and
changed the Blending Mode to MULTIPLY.
It is always important
to play with the ol' OPACITY and BLENDING
MODES as they can greatly affect the
end visual impression of your overlapping
layers.
|
 |
|
|
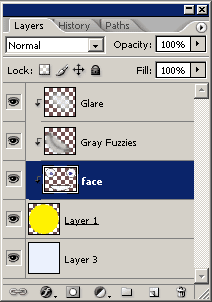
To make something approaching a finished
project for this tutorial, I added a
face, as well as a WHITE FUZZY (for forhead
glare) to the image.
Notice that they are
all clipping layers, and that the bottom
of the Clipping Stack
is the layer that sets the BOUNDARY for
the clipping layers above. Try clipping
and unclippng the layers (using that
funky overlapping circle thing with
an arrow pointing out the side) to
see the difference in the end result.
|
 |
Okay! That's the
end of the Clipping Mask 101 tutorial. I hope
you found it helpful in getting a basic understanding
of this part of Photoshop. Be good to each
other, and Remember To Share The Knowledge!
- Reinier
� all photoshop tutorials
|